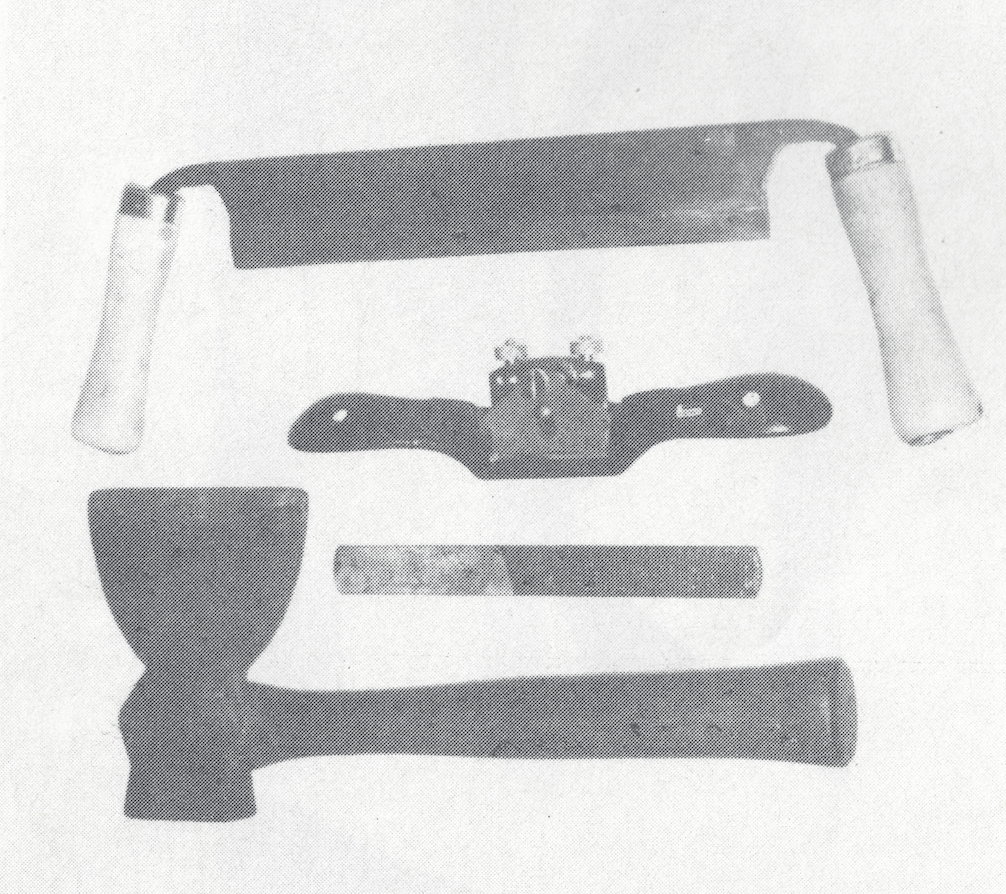
Picture of Author’s Tools
I really like tools. It’s a weakness of mine I readily confess. Mostly, I like tools that relate to bow making, and any tool I see that I think might be useful. I buy immediately if I can afford it, and sometimes even if I can’t. As a result of this addiction, I’ve got everything from a bandsaw to a bowscraper, and I’m always on the lookout for something new. I’m a sure sell for anything I see advertised in “Worth Taking a Closer Look” in Primitive Archer and when we go places, my wife insists on driving so she can speed up past the hardware stores.
Yet, despite my fondness for bowmaking tools, I have to admit that almost any stave can be turned into a bow with only four basic tools; a handaxe, a drawknife, a spokeshave, and a rasp. Most bowyers either have each of these tools or a substitute, such as a bandsaw for an axe. Sure, additional tools make the job easier and faster, but you don’t have to have them. Add a string or straightedge to keep your limbs straight, broken glass to scrape away rasp marks, some sandpaper, and a lot of muscle and patience, and you can make as fine a bow with these four as you can make with several hundred dollars worth of power tools. This is what makes primitive archery so great!
If you’re just starting to make your first bow and thinking about buying tools, perhaps this article can help you decide what you need. Or, if you decide what you need. Or, if you already have these tools, maybe it can offer some tips for improving them and keeping them sharp. After all, a typical cutting tool, as it comes from the manufacturer, is little more than a blunt instrument. It takes about fifteen minutes of fine-tuning to turn this sow’s ear into a silk purse.
Let’s start our study with the largest of the tools, the hand axe, or hatchet.
The Hand Axe
The hatchet is the best hand tool I know of for initially shaping a stave and taking off bark and sapwood. Some people have the ability to work the back of an Osage stave down to one ring using only a hand-axe, and use it for a lot of belly shaping as well. Hatchets can be frequently found at yard sales and flea markets in any number of designs and sizes, from tiny camping hatchets to “roofer’s hatchets”, used for putting cedar shakes on a house. All will work quite well, although my personal preference is for a “broad hatchet”, which looks like a miniature broadaxe in that one side of the blade is beveled and the other is not. The flat side of the edge bites into the wood, while the bevel turns the chip. This lets you square the sides of the stave more easily and is probably the reason in has been called “the poor man’s bandsaw”. It is also, I feel, safer as there is less chance of a glancing blow because the bevel is not against the wood.
My broad hatchet is an old one I bought at a flea market, and it weighs about two and a half pounds, which is quite heavy as hatchets go–almost as heavy as a light axe. Because it is so heavy, I don’t have to use as much downward force, which in turn enhances control. For fine work, I grip the handle a few inches below the head.
When you hold a broad hatchet, the bevel must be to the outside, while the flat edge must be on the inside, next to the wood. This is important, because if the bevel is next to the cutting surface, then the bit of the axe will surely glance, causing a potentially dangerous situation. And if you’re left-handed, this is going to be the case, because most broad hatchets are set up for right-handed people. However, if you’re a southpaw, don’t despair: all you have to do is remove the handle and re-insert it from the other end of the socket and presto! — you’ve got a left-hand broad hatchet. (I know this sounds like one of those “left-handed monkey wrench” stories, but it’s true. Think about it.)
When sharpening a hatchet, make sure the bevel is maintained as a flat angle, not curved. I would avoid using a grinder to do this, especially a power grinder unless the edge has been severely abused. After filing whenever necessary (such as removing the factory edge), a stone provides the sharpest possible edge.
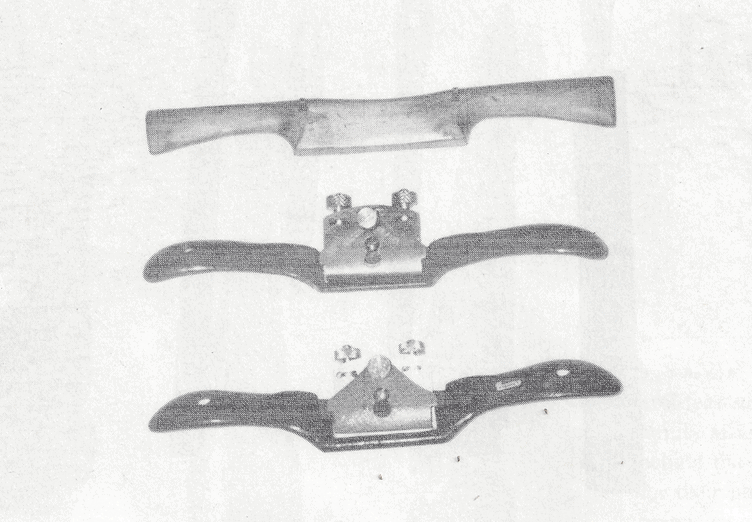
Top to bottom: Wooden Spokeshave, Record Round-Sole, Stanley Flat-Sole
The Drawknife
A drawknife is helpful in shaping the belly and sides of the stave so it looks like a bow rather than a long, thin lump of wood. Like many bowyers, I also use the drawknife to one growth ring, unless the rings are impossibly thin, in which case I use a scraper or a pocket knife.
Drawknives are also items that can be picked up at flea markets but it can be pretty hard to find a good one. When you do, they usually cost almost as much or more than a new one. If you buy a used knife (or any other cutting tool), check the blade for severe pitting on the backside, which will make sharpening impossible. All things considered, it’s about as cheap to buy a new one. Very good ones cost about forty bucks.
Drawknives have either straight blades or blades that have a slight curve. Jim Hamm has a curved-blade drawknife he never sharpens and swears by it as his best tool for working down the back of Osage staves. Mine has a straight blade I keep razor-sharp. It does the job very well, but I’d like to try the curved-and-dull method just once, to see how it works. For me, more problematical than the blade design has been handle shape. I have a German-made drawknife that has offset handles that supposedly makes it more efficient. Unfortunately, this makes it all but impossible to use with the bevel down, which is the best way to use a drawknife for bowmaking. I had to buy another one, this time with handles directly in line with the blade.
An advantage the drawknife has when used bevel down is that it will frequently ride over humps and knots on the back of a bow without cutting through them as long as you don’t use too much downward force. The crown on the back of a stave helps by reducing the amount of wood in actual contact with the blade, having much the same effect as a curved blade. A drawknife will however tear wood with curly grain, like Osage and yew, especially on the side or belly of a limb, where there is no crown. It is no finishing tool. This tearing tendency can be somewhat reduced by keeping the blade very sharp and by drawing it across the wood at an angle.
When sharpening a drawknife, I place the stone in a vise and draw the blade across it at the proper angle. Some hold the drawknife against the left arm (for right-handed people) somewhat like a violin, with one handle tucked against the shoulder, the other held firmly on the left hand. This allows them to see the bevel. They then rub the stone against the blade. (If you do this, watch your fingers!) Either way does a fine job.
The Spokeshave
This is my favorite cutting tool for bringing a bow “round compass”. Spokeshaves can be broken down into two categories: iron-frame spokeshaves and wooden-frame spokeshaves. Iron spokeshaves are not especially difficult to come by; you can find them frequently in a large hardware store. The two most common brands are Stanley and REcord, which are nearly identical except for color. Record spokeshaves have a slightly thicker blade and are a few dollars cheaper. Both are made in England, perhaps by the same manufacturer. Both have blades that are easily adjustable by turning two nuts on top of the blade. Other adjustable iron spokeshaves are available, including those made in Germany and India. These cost from thirteen to twenty-five bucks. Cheaper iron spokeshaves, which are adjusted by loosening a wingnut and manually sliding the blade up or down, only cost from eight to 10 dollars. but are difficult to adjust and I do not recommend them. An iron spokeshave has either a flat sole or a rounded sole. The flat sole is better for working flat surfaces, such as sides and bellies of flatbows. The round sole is best for working concave surfaces such as the dips on a longbow or the flare from the handle area to the limb of flatbows. I have and use both, but if I had to own just one, it would probably be the round sole spokeshave, since it is a bit more versatile.
As they come from the factory, spokeshaves are quite dull. Yes, they will cut as they are, but not very well. Luckily, you can improve on your spokeshave to a starling degree with three simple procedures, starting with honing the blade to an edge sharper than most broadheads.
When sharpening a spokeshave, lose your file, unless the blade is damaged severely. A file is way too aggressive and creates a rough, saw-like edge (as seen under a microscope) that breaks down quickly under usage. This means you have to sharpen it more often, and you will soon wear out your blade. In order to hone a spokeshave to an ultimate, razor edge, you must have a good, flat stone of medium grit and a hard, fine stone to polish the edge. Medium and hard Arkansas stones are good, but I use a 1000/6000 grit combination Japanese Waterstone, which is fairly inexpensive and easy to use. Occasionally, I “lap” the stone, or make it flat, by laying a piece of medium grit wet/dry sandpaper face up on the pane of glass (or other flat surfaces) and rubbing the stone across it. Without absolute flatness, the blade will take on a concave bevel when you sharpen it.
The angle of the bevel on a spokeshave blade is from 25 to 30 degrees, but consistency in honing is much more important than absolute adherence to this angle. You can only get this consistency with a honing guide. Most commercial honing guides just won’t work, since they are made to sharpen plane blades, which are much longer. I have included plans for a shop-made honing guide that is easy to make and does a great job. (Figure 1) With this guide, you can hone a spokeshave blade literally as sharp as a straight razor.

The second step in fine-tuning a spokeshave is to polish the backside of the blade. This allows the microscopic edge to be much finer, thus sharper. You don’t have to polish the entire back, just a small distance up from the edge. This is where the 6000 grit waterstone comes in handy, imparting a sheen to the steel like a mirror. (By comparison, crocus cloth is only 800 grit.) Such an edge will not break down as readily under use, which means it will stay sharp longer.
The third and final step is to polish the sole. This trick was shown to me by an old-time woodworker who swore it made a tremendous difference in how the tool worked. For polishing, you need a sheet of medium and fine emery cloth and a sheet of crocus cloth. First, remove the blade. If you’ve got a round-sole shave, lock it in a vise and use strips of emery cloth to give a “shoeshine” to the sole. IF your spokeshave has a flat sole,m follow this procedure: lay the emery cloth on a sheet of glass against a hard, flat surface and pressing the sole flat against it, begin rubbing the spokeshave back and forth. In a couple of minutes, the milling marks will disappear. Now change to fine emery, then to the crocus cloth until the surface is smooth and polished. What this does is reduce the friction coefficient between the metal sole and the wood. It takes patience but ti’s definitely worth the past few minutes it takes. (Besides, patience is good for the sole. Har, har.) Reassemble your spokeshave and try it on a piece fo bow wood. YOu should notice a truly remarkable difference. Your spokeshave will now remove a shaving as long as a well rope and as thin as a politician’s promise.
The Wooden Spokeshave
I prefer a wooden spokeshave to the iron ones. They are lighter and have a better “feel” in the hand, one that is completely different from their iron grandchildren. However, good ones are hard to find. At least one company still makes them, but at a cost of something like three times the price of an iron shave. Your best bet is to scour the flea markets for antique spokeshaves, of which there are plenty. However, most of them have blades which, through repeated sharpening, have taken an extreme concave shape, sometimes past the usable part of the blade. This makes them essentially useless.
But you can sometimes come across a good one for about the price of a new iron shave. If the blade is in very good shape and the price is right, I’d recommend you buy it, even if the stock shows some wear in the area of the sole. This is pretty easily repaired by inletting the sole with the chisel and replacing it with a strip of hard wood. Boxwood shaves are more desirable (and generally more expensive) than beech shaves, because they resist wear better.
While some wooden spokeshaves have adjusting nuts much like modern iron shaves, typically a wooden shave is adjusted by tapping on the tow ends of the blade lightly with a piece of wood until you reach the depth of cut desired. Try for a thin shaving, which gives you more control. Before using rub a little candle wax on the sole to help reduce friction.
Wooden spokeshaves are fairly difficult to sharpen by hand; the turned-up ends get in the way and you need a narrow stone. Their shape invites the use of a file, and this might be the reason so many of the old ones are ruined. As when sharpening an iron shave, consistency is important here, too. To ensure it, I use a knife sharpening kit, and it’s made all the difference in the world. I hold the blade in place with the kit’s clamp and work on it with medium-fine stones until it’s razor-sharp. Before I began doing this. I was never able to enjoy the full potential of my wooden shave. Now it’s my favorite.
Rasps
For final tillering a rasp is essential. Actually, tow rasps are best: a coarse one and a fine one, sometimes called a wood file. Rasps are the one tool that you cannot sharpen, and so the only way to improve them is to add a handle or perhaps a tape wrap on the other end so you can use both hands.
Some like the type of rasp called a “four-in-one” rasp, half-round tool that is combined with a wood file. I don’t particularly care for them, because they are so short you can’t get a full stroke. They are, however, a lot of tools for the money, typically costing only about nine dollars.
My favorite rasp is a farrier’s rasp (a farrier is one who shoes horses). this is so monster rasp with an excellent file on the opposite side and will hog away the wood with such ease it can easily get you in the trouble. It is definitely not for final tillering. These can be found in flea markets very cheap usually in pretty good shape, or you can buy a new one at a large hardware store. A truly excellent tool.
A standard wood rasp cost about ten dollars, a wood file about eight. A high-quality finishing rasp, called a patternmaker’s rasp, can cost up to forty bucks. They’re nice, but not essential. An alternative is a Japanese saw-blade type rasp, which is very versatile.
The ideal (in my opinion) basic bowyer’s tool kit would cost about $115-125 if you bought everything new. The most expensive item is probably the drawknife, the least expensive is the rasp. However, you can do better than that by shopping around, by buying a less expensive, but still entirely suitable roofers hatchet, a cheaper drawknife, a less expensive adjustable spokeshave, and a four-in-one rasp. With everything new, such a tool kit would cost about $65 and still be very practical. Cheaper yet is to scour flea markets for good used tools, where you might be able to get by for as little as $30-40.
To put this in perspective, consider this: a used, cheap, fiberglass longbow costs about as much as a first class set of tools. A good Osage stave costs about as much as a set of good “second string” tools. And a romantic dinner for you and your spouse at a fairly good restaurant costs more than a set of flea market tools. So, you see, it’s a good investment. But then, too, so is a romantic dinner with your spouse.
Volume 3 Issue 1

Above: Smaller knife is a carver’s drawknife; larger is better for most rough work.